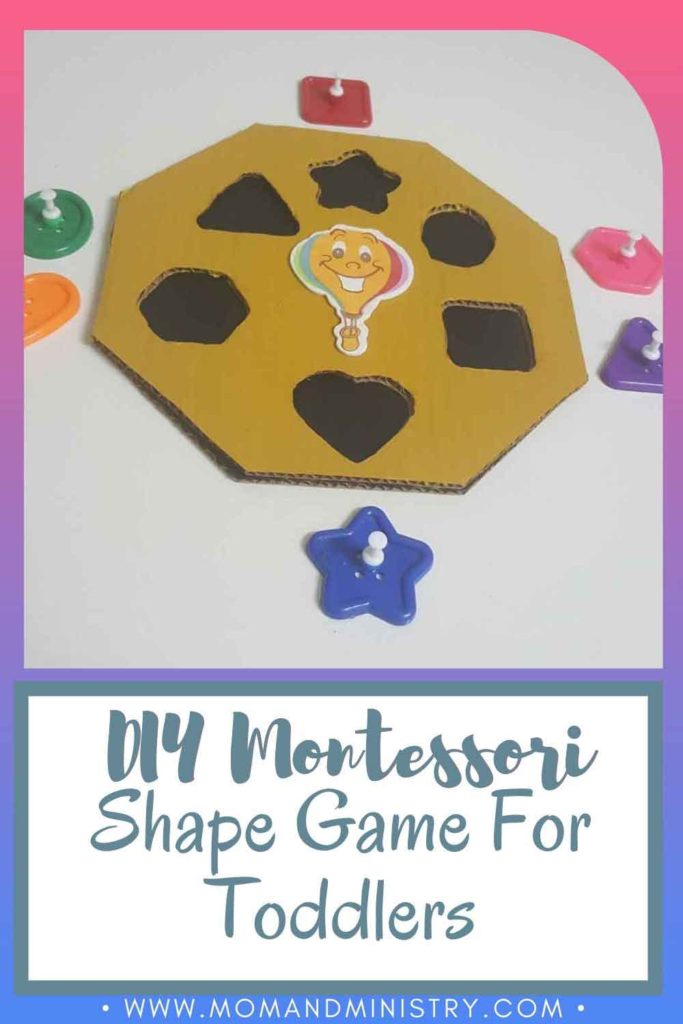


Hi friends, I am delighted you found this post. If you are looking for a low-cost DIY Montessori-inspired activity for your toddler, here is one that does not require too much time and effort. You won’t regret making this big button-matching Montessori board for your little ones. It is easy and affordable.
I love Montessori activities, but I have to admit that some can be a bit costly. So I try to make a few of my own Montessori-inspired activities using items from around my home. If you have visited some of my other posts, I am a big fan of having fun at a low cost. So this DIY Montessori-inspired activity is just another way of having some fun playtime learning with my little ones. My daughter loves it. My son is past that stage, but guess what he loves this Montessori toy too.
As your toddler makes use of this Montessori Shape Matching Activity they will be able to:
Depending on how advanced your child is they can use this Montessori toy from 2 years old. My daughter is two years and she is able to match the shapes, I am certain your child will be able to as well.
I share the activities that I try my children with you so you can try them too. As usual, I like to include a short video showing the process of making the item, along with steps broken down for those who like things a bit slower. For this DIY Montessori toy it’s no different.
Cardboard
Poster paint (Optional)
White glue
Craft or exact knife
Large buttons and Pony Bead to Match
Thumbtacks
Krazy glue
Decorations (Optional)
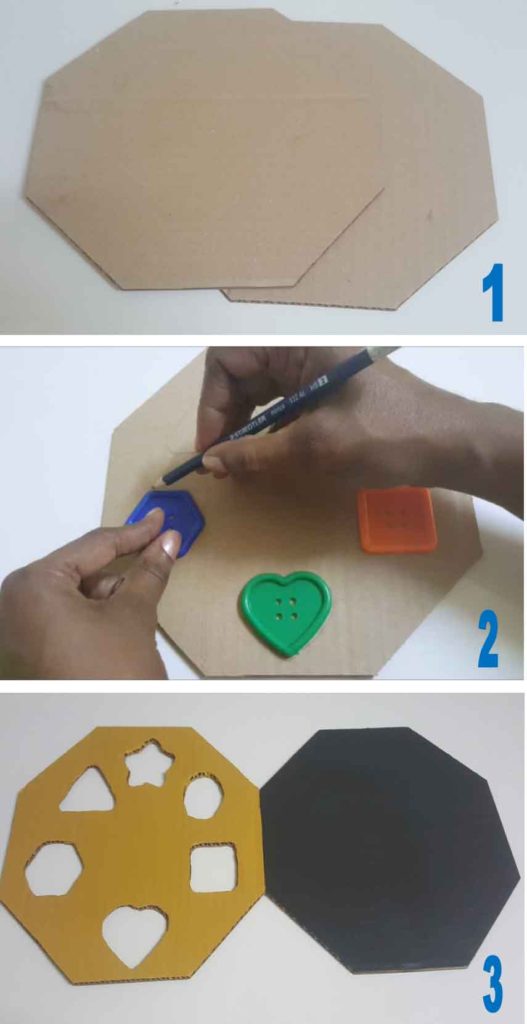
Cut the cardboard to the desired shape and size depending on how many buttons you want to use. It’s ok to have the same shape twice with different colors. You can cut your cardboard into a geometric shape or you can be creative and explore an abstract shape also. The sizes of the cardboard will be determined by how many buttons you want to use.
Using the buttons you selected, draw the shapes in the positions that you wish them to be placed. Again there is no special way to do it. This is totally up to you. Once you are satisfied with your placement use an exacto or craft knife to cut out your shapes. This can be a bit tricky but once you take your time it will turn out just right. I personally prefer the exacto knife because of the pointy edge that cuts those sharp small areas much better.
Paint one side of both pieces of cardboard with whatever color you desire. I like to use black for the background, because of the contrast to the colors of the buttons. It also gives the shadow effect. Then use another color for the top. Feel free to leave the cardboard without paint if you prefer to. Once you are done painting, set aside to dry
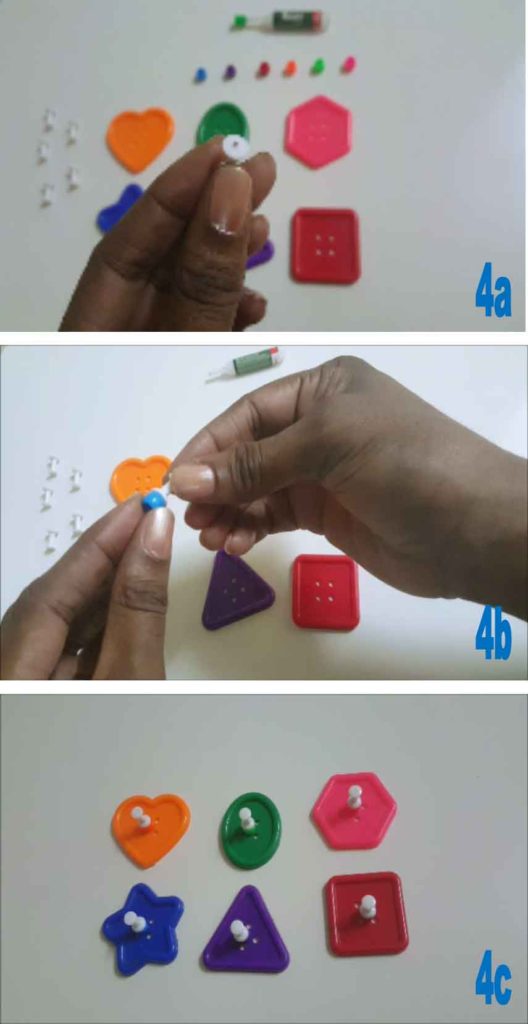
Using cutting pliers, cut off the pointy end of the thumbtacks. One thumbtack for each shape you have. I used the same color as the shape. However, you can choose contrasting color thumbtacks or a single color. I choose white since it is easy to see and grab. Attach a pony bead to the end it the thumbtack using Krazy glue. Allow drying for a few seconds.
Apply Krazy glue to the other side of the pony bead and attach the shape button. As mentioned earlier, feel free to use the same color or you can use a different color to make it more interesting. Allow drying for a few seconds.
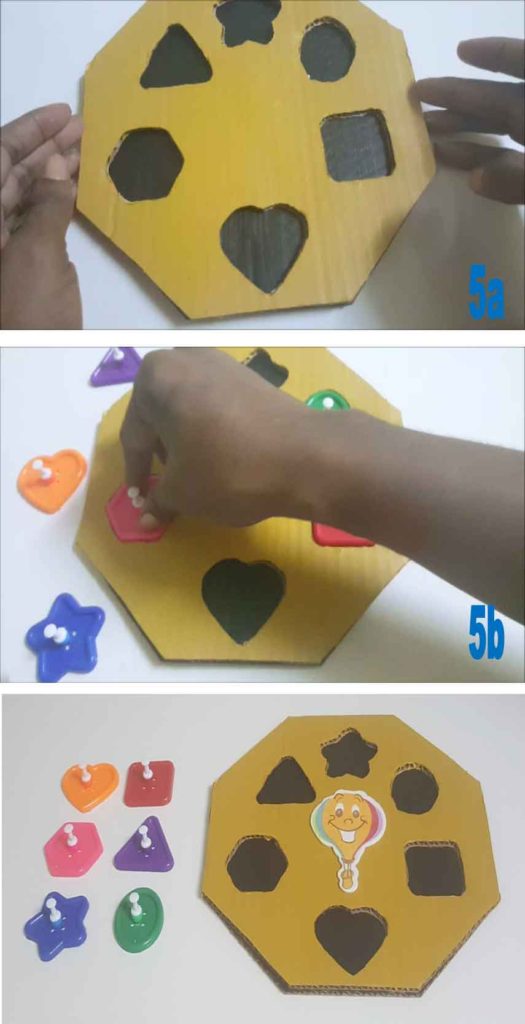
Apply ample amounts of white glue to the piece of cardboard with the shape cutouts. You can use a small brush to evenly spread the glue. Stick this piece of cardboard onto the painted side of the other piece of cardboard. Press firmly into place and allow to dry thoroughly. If you wish you can place a book on top of the cardboard. It helps to ensure every area is stuck together well. I added a foam shape to the center as decoration. You can decorate your Montessori toy any way you like. Once your cardboard has completely dried, add your shapes and your DIY Montessori Matching game is ready for your toddler to use.
Wonderful you are done! That’s it set on a table along with the buttons and watch your toddler match their shapes.
It’s always a pleasure for me to see my children play with items I spent time making. It’s not always about the store-bought items. It’s ok to try making some toys, and learning activities of your own. Your children will love it. And it will surely bring joy to your heart to know they appreciate something you made. Start today!
Let your creative juice flow.
Here are some other fun DIY ideas you can try always fun and always affordable
As always thank you for reading this post.
Thank you for your support! Do stay safe and blessed.
| Cookie | Duration | Description |
|---|---|---|
| cookielawinfo-checkbox-analytics | 11 months | This cookie is set by GDPR Cookie Consent plugin. The cookie is used to store the user consent for the cookies in the category "Analytics". |
| cookielawinfo-checkbox-functional | 11 months | The cookie is set by GDPR cookie consent to record the user consent for the cookies in the category "Functional". |
| cookielawinfo-checkbox-necessary | 11 months | This cookie is set by GDPR Cookie Consent plugin. The cookies is used to store the user consent for the cookies in the category "Necessary". |
| cookielawinfo-checkbox-others | 11 months | This cookie is set by GDPR Cookie Consent plugin. The cookie is used to store the user consent for the cookies in the category "Other. |
| cookielawinfo-checkbox-performance | 11 months | This cookie is set by GDPR Cookie Consent plugin. The cookie is used to store the user consent for the cookies in the category "Performance". |
| viewed_cookie_policy | 11 months | The cookie is set by the GDPR Cookie Consent plugin and is used to store whether or not user has consented to the use of cookies. It does not store any personal data. |