3 Adorable Tissue Paper Thanksgiving Crafts- With Free Printable
Thanksgiving will be here soon. Here are 3 Thanksgiving Crafts that are a great way to reinforce the concept of giving thanks with your children. Teaching children to give thanks is absolutely a great thing. These tissue paper thanksgiving crafts are simple and affordable. You can do them with your family as you give thanks this season. You can also make a few that you can give to someone you are thankful for. God’s word says we, children, adults, young and old should give thanks in all situations.
Start Thanksgiving Here!
In other words as parents we should encourage our children to give thanks for the things they have, for the things they don’t have, give thanks for others, give thanks in advance for the things they would like. Thank God for good times and times that are not so good. The list of things to be thankful for can go on and on.
As you speak to your children this thanksgiving season and encourage them to give thanks, you would find that their understanding of thankfulness will grow and grow. It’s not always easy to give thanks especially when there is great uncertainty. However, after a while even through difficult seasons, they would be reminding you to give thanks.
That’s why I’m sharing these adorable and simple thanksgiving crafts. It includes several free printables you can use to create beautiful thanksgiving art for your family, home and others too. This thanksgiving craft is also great for Sunday School class to engage children in giving thanks. I have also included a few extra templates that you can use to make other variations of these thanksgiving crafts.
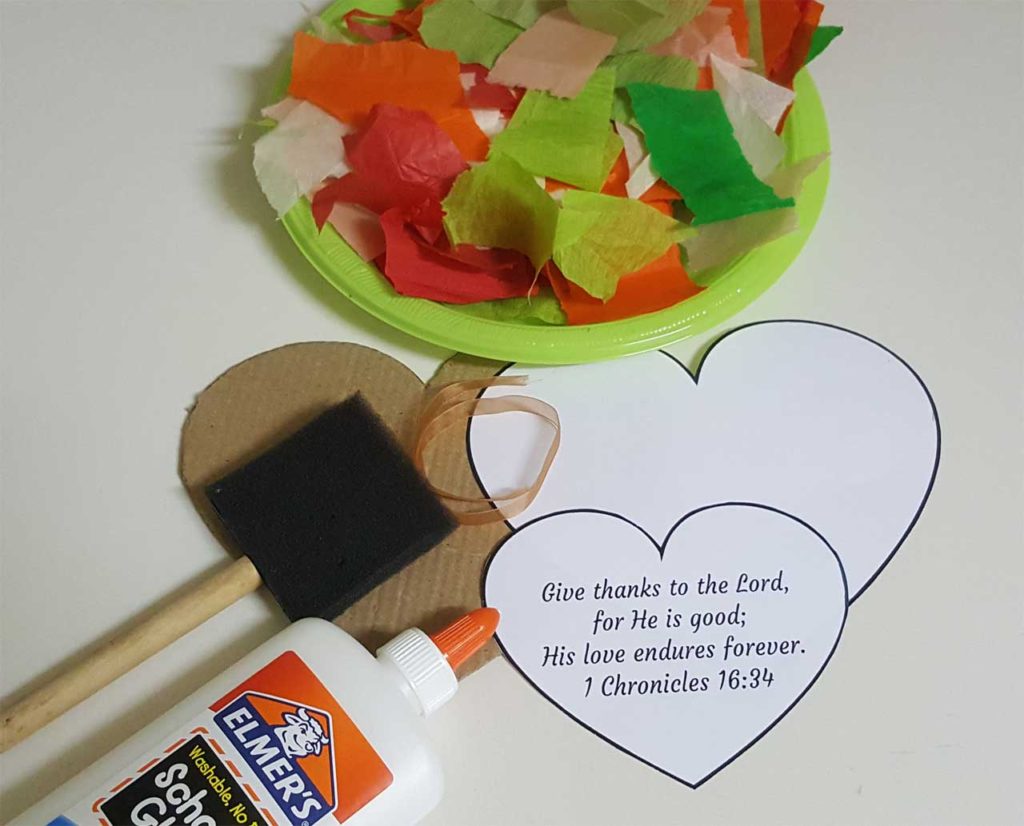
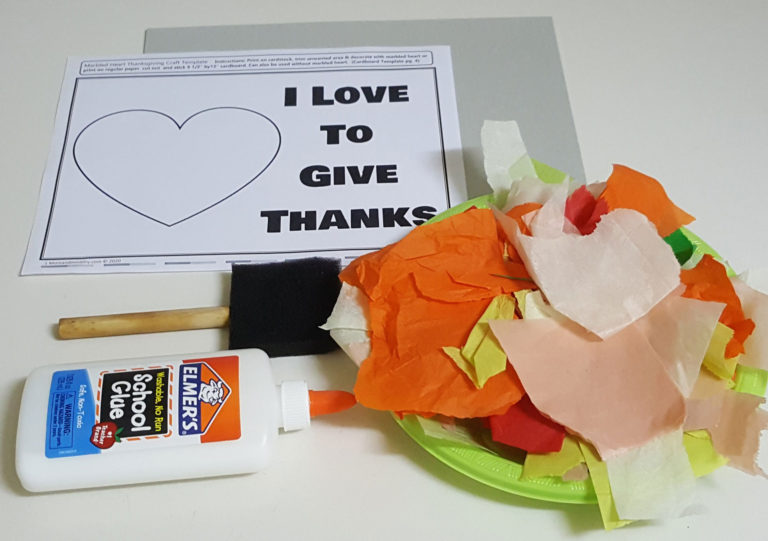
Marker, crayons, or colored pencils (depending on which printable you use)
Preparation For Thanksgiving crafts
Required for any of the printable crafts you decide to do, but may vary.
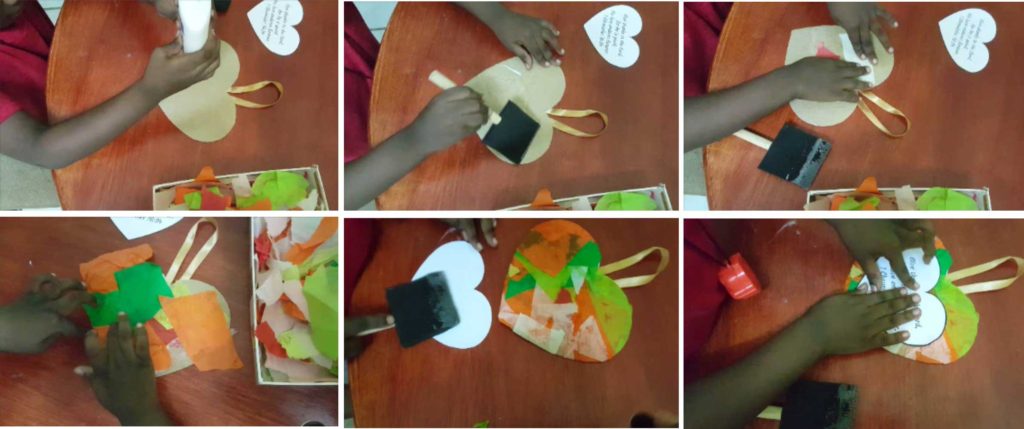
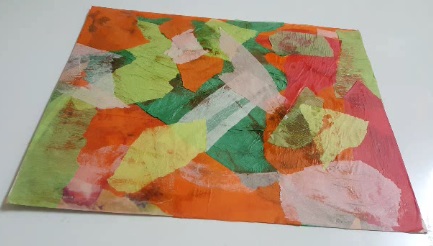
1. Tear or cut tissue paper into smaller pieces, use various sizes to help cover cardboard faster, for larger pieces tear big pieces of tissue paper. I also included some crepe paper for texture, but tissue paper is more resilient for this activity.
2. Cut out cardboard pieces of different sizes. You can use the heart template to cut out your cardboard hearts.
3. Print templates and cut those you desire to try.
Thanksgiving Craft 1
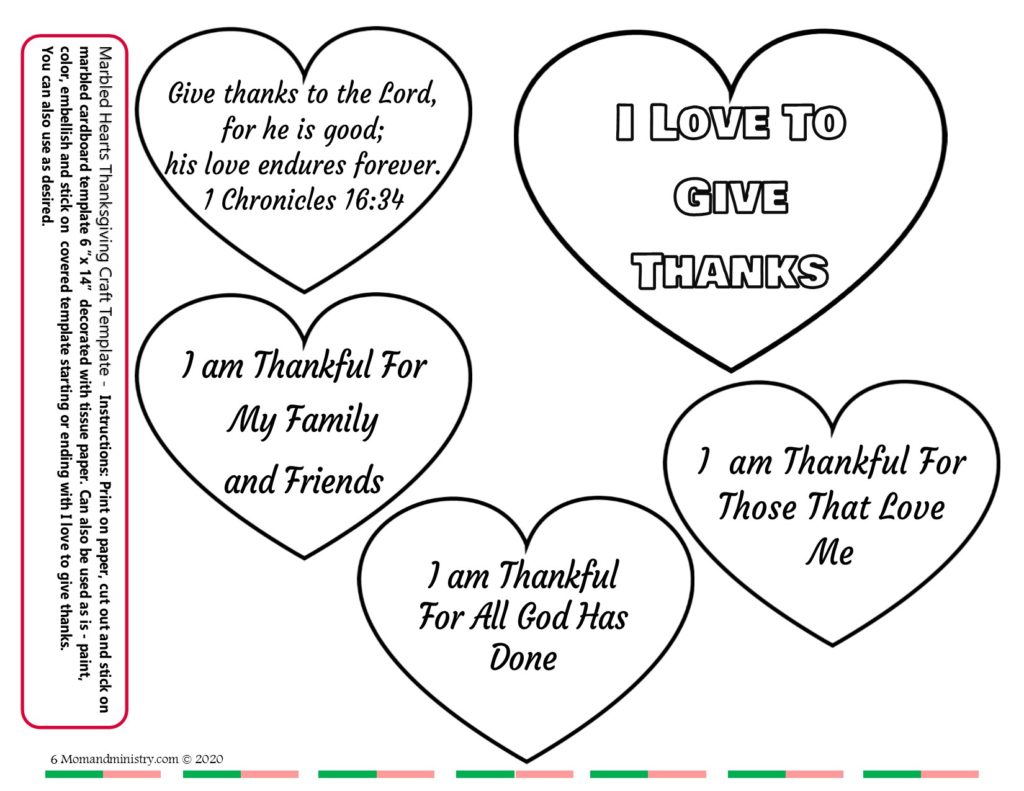
I Love To Give Thanks Wall Hanging With Multiple Hearts
Step 1
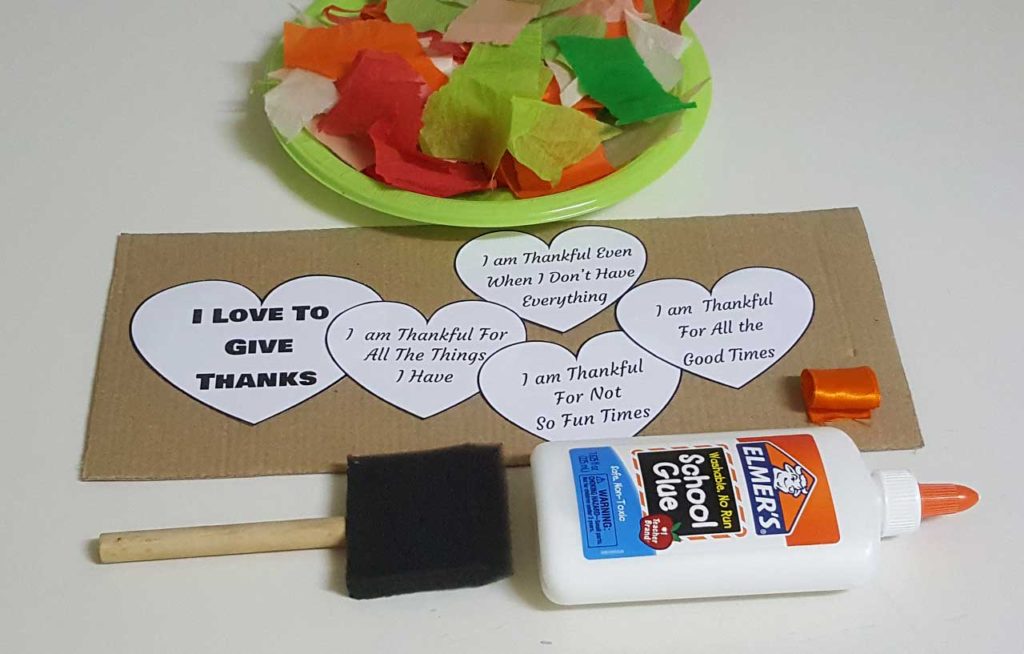
Cut out cardboard template 6″ x 14 ” and cut out multiple hearts thanksgiving printables page 5. Along with pieces of tissue paper and a 10″ piece of ribbon that is a color of your choice
Step 2
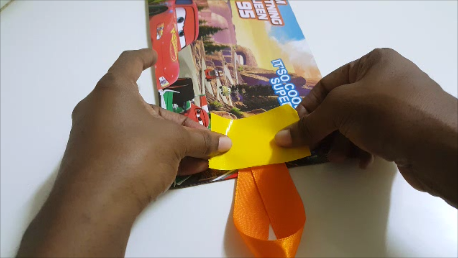
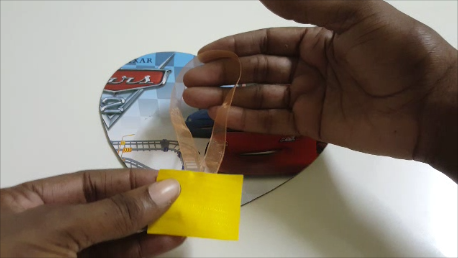
Fold the ribbon in half and stick it to the back of the cardboard template using masking tape or duct tape to hold it securely in place so you will be able to hang your artwork.
Step 3
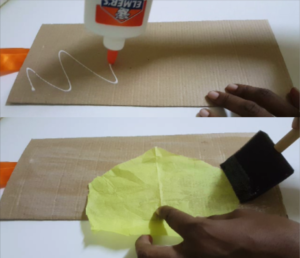
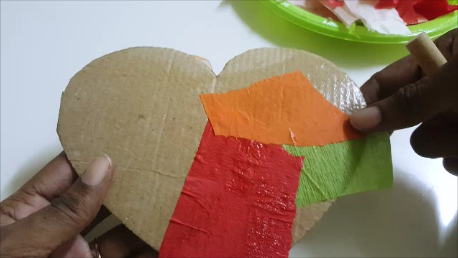
Add glue to cardboard template and spread using a sponge brush
Step 4
Apply tissue paper to the front and back of the cardboard template and use a brush to help stick or just pat it down with fingers. Cover the entire template until you are satisfied with the appearance.
Step 5
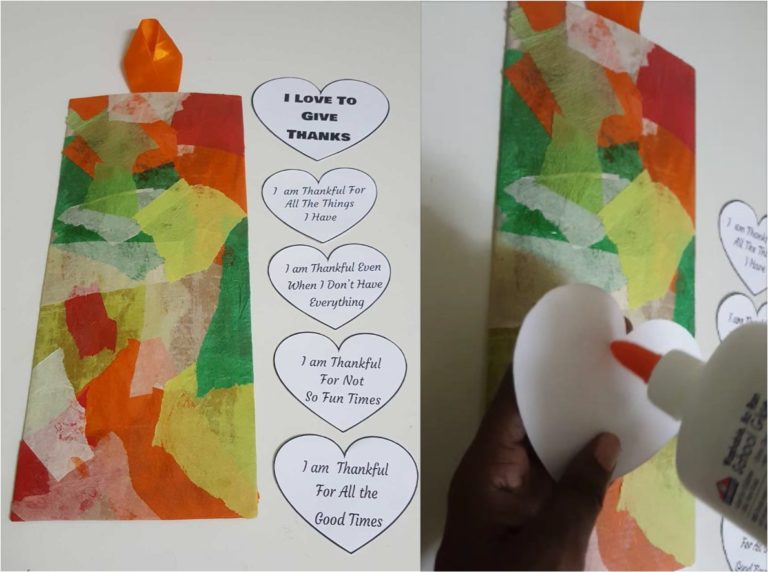
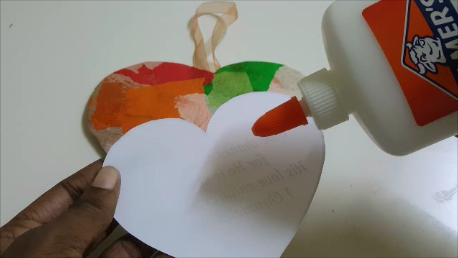
Line heart cutouts next to covered cardboard in the order you wish to stick them. Starting or ending with I love to give thanks.
Step 6
Apply glue to the back of the hearts and stick them on tissue-covered cardboard
Step 7
Ensure that all areas are stuck well and your thanksgiving craft is done! As you go along be sure to discuss the various phrases and allow kids to share how they feel about them.
Thanksgiving Craft 2
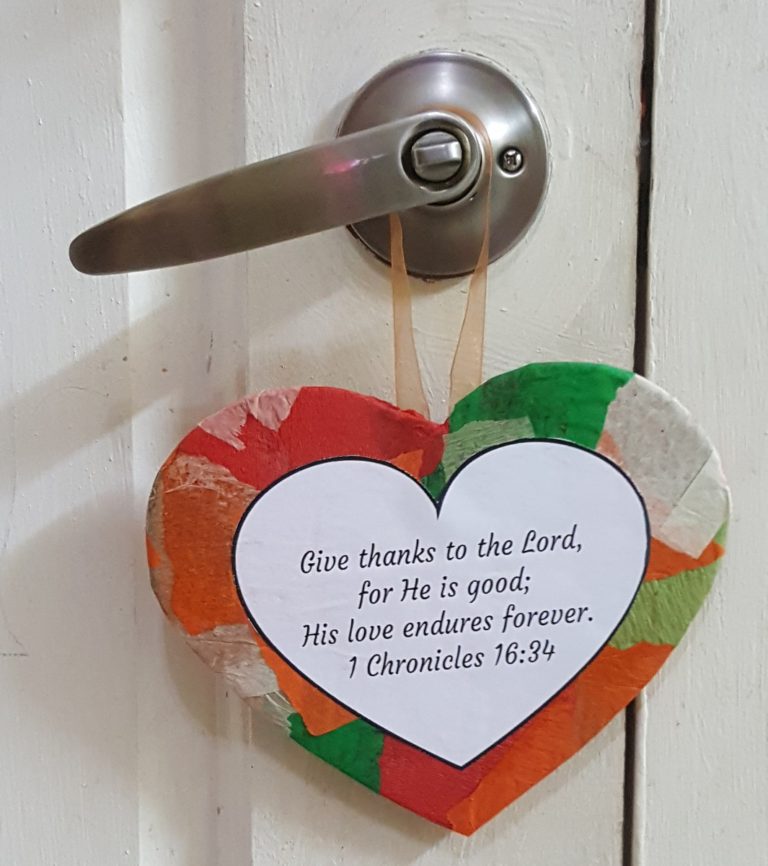
Single Heart Thanksgiving Door Hanger
Step 1
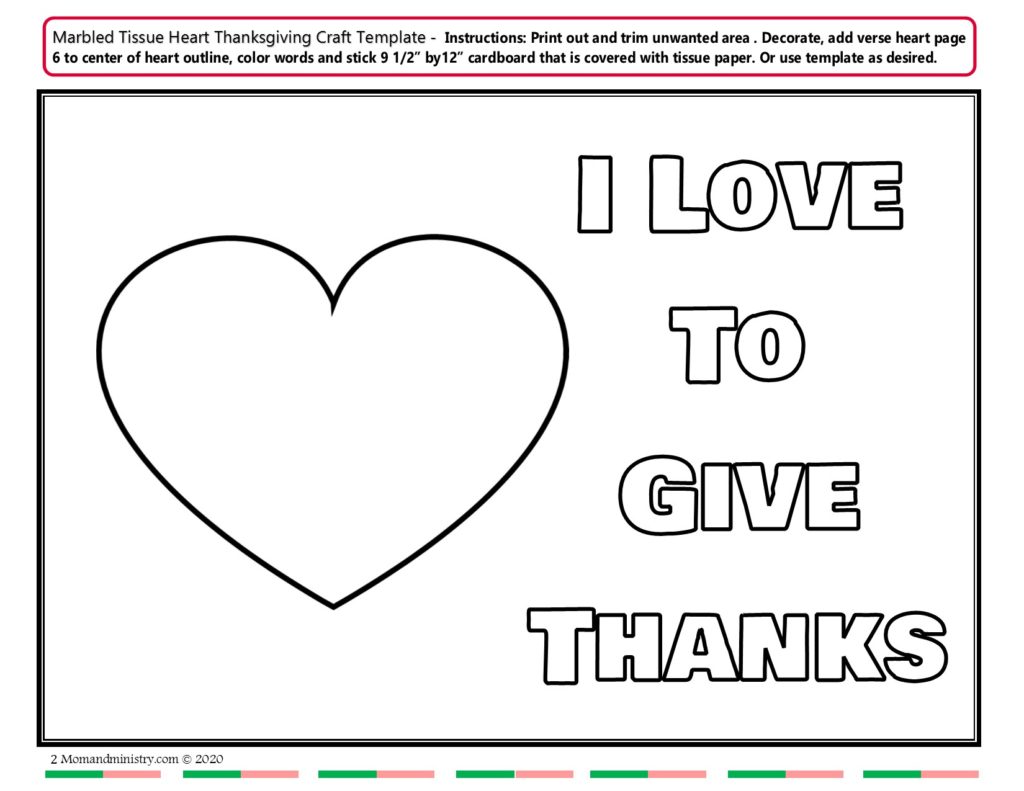
Cut out the cardboard using the single heart thanksgiving template on page 4. Along with pieces of tissue paper and a 10″ piece of ribbon that is a color of your choice
Step 2
Fold the ribbon in half and stick to the back of the cardboard heart template using masking tape or duct tape to hold it securely in place so you will be able to hang your artwork on your door.
Step 3
Add glue to cardboard template and spread using a sponge brush
Step 4
Apply the tissue paper to the front and back of the cardboard heart template and use a brush to help stick or just pat with fingers. Cover the entire template until you are satisfied with the appearance.
Step 5
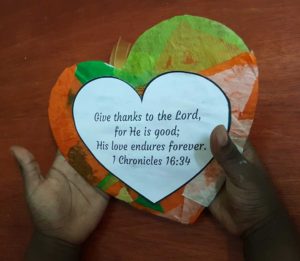
Stick the small heart print to the center and you are done! Simple and beautiful and a great way to teach and reinforce the need to give thanks.
Step 6
Ensure that all areas are stuck well and your thanksgiving craft is done! As you go along be sure to discuss the various phrases and allow kids to share how they feel about them. It’s amazing to hear the children share their opinions. Ephraim, my 4-year-old son enjoyed the discussion on giving thanks as he helped me with this post. I know my daughter enjoyed it also as she did it her own way. Do enjoy these special moments as you do this activity with your children also.
Here is a great activity you can try also if you haven’t already.
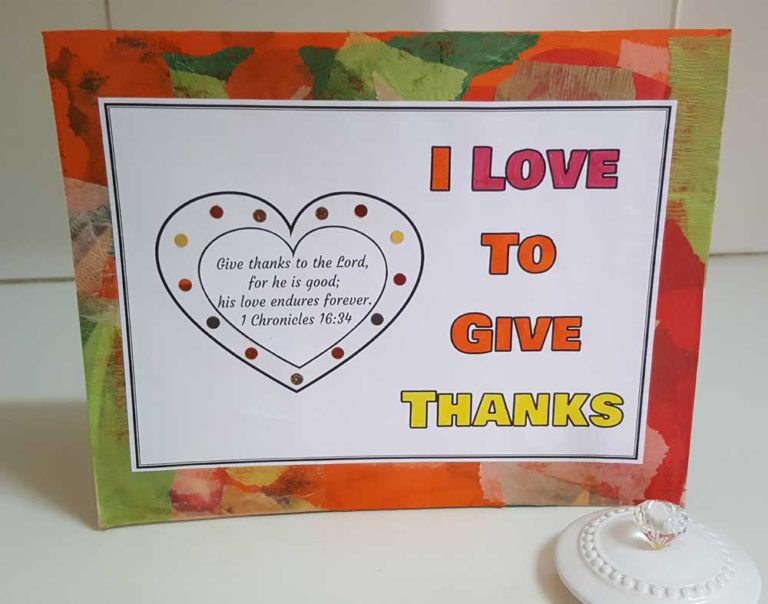
Cut out cardboard template 12 ½ by 9 ½ inches and printable on page 1 or 2. Along with pieces of tissue paper.
Step 2
Cut a strip of cardboard fold as desired, sticking with duct tape to help your table décor stand. You can also use an old picture frame stand or plate stand and illuminate this step
Step 3
Add glue to cardboard template and spread using a sponge brush
Step 4
Apply tissue paper to the front of the cardboard template only. Cover the entire template until you are satisfied with the appearance. If the cardboard is printed you would want to cover the printed side. Trim and overhanging tissue paper. Set aside when done.
Step 5
If you are using the printable on page 2 you may want to have children color the letters and decorate them before sticking them onto the finished tissue-covered cardboard. Like this picture below
Step 6
Stick chosen small heart print from page 6 or 7 and stick to the center
Step 7
Decorate as desired and you are done! And children are sure to enjoy this activity as you teach and reinforce the need for them to be thankful.
You can add this to your table as you celebrate Thanksgiving this year. I am certain it would make a great conversation starter.
Teaching your children to give thanks is just one of the ways you can develop their relationship with the Lord. You can make thanksgiving part of your daily routine and not just seasonal. A constant heart of gratitude as they grow in grace.
If you are reading this post and you have not asked the Lord to be your Saviour and friend and you would love to make that decision to know and love God. Feel free to email me for more information at momandministry1@gmail.com.
I’d Love For You to Check Out These Posts
or pin them for later
In the meantime stay safe and blessed. And as always thank you for reading this post.
We use cookies on our website to give you the most relevant experience by remembering your preferences and repeat visits. By clicking “Accept”, you consent to the use of ALL the cookies.
This website uses cookies to improve your experience while you navigate through the website. Out of these, the cookies that are categorized as necessary are stored on your browser as they are essential for the working of basic functionalities of the website. We also use third-party cookies that help us analyze and understand how you use this website. These cookies will be stored in your browser only with your consent. You also have the option to opt-out of these cookies. But opting out of some of these cookies may affect your browsing experience.
Necessary cookies are absolutely essential for the website to function properly. These cookies ensure basic functionalities and security features of the website, anonymously.
Cookie
Duration
Description
cookielawinfo-checkbox-analytics
11 months
This cookie is set by GDPR Cookie Consent plugin. The cookie is used to store the user consent for the cookies in the category "Analytics".
cookielawinfo-checkbox-functional
11 months
The cookie is set by GDPR cookie consent to record the user consent for the cookies in the category "Functional".
cookielawinfo-checkbox-necessary
11 months
This cookie is set by GDPR Cookie Consent plugin. The cookies is used to store the user consent for the cookies in the category "Necessary".
cookielawinfo-checkbox-others
11 months
This cookie is set by GDPR Cookie Consent plugin. The cookie is used to store the user consent for the cookies in the category "Other.
cookielawinfo-checkbox-performance
11 months
This cookie is set by GDPR Cookie Consent plugin. The cookie is used to store the user consent for the cookies in the category "Performance".
viewed_cookie_policy
11 months
The cookie is set by the GDPR Cookie Consent plugin and is used to store whether or not user has consented to the use of cookies. It does not store any personal data.
Functional cookies help to perform certain functionalities like sharing the content of the website on social media platforms, collect feedbacks, and other third-party features.
Performance cookies are used to understand and analyze the key performance indexes of the website which helps in delivering a better user experience for the visitors.
Analytical cookies are used to understand how visitors interact with the website. These cookies help provide information on metrics the number of visitors, bounce rate, traffic source, etc.
Advertisement cookies are used to provide visitors with relevant ads and marketing campaigns. These cookies track visitors across websites and collect information to provide customized ads.


